Photos, Drawings & Story By Robin J. Miller
Cat litter pails are sturdy containers with hinged lids that can hold
a surprising amount of material: from toys to poultry grit to grains to oyster shells
to assorted soil remineralization supplies. This rack converts bucket clutter
into a useful tool.

Cat litter pails may be available for free, via a donation to an area animal shelter or on Craigslist if you don’t keep cats. This 12-pail rack is crafted from two 4-by-8-foot sheets of ¾-inch plywood. The completed rack stands 53 inches tall by 46.75 inches wide. Pails are supported on their rims at a 45-degree angle and by stops located inside the rack.
In addition to construction adhesive and nails, the rack interlocks the major components. Each 16-by-48-inch support/divider has two 13-inch slots designed to accept a crossing “pail platform.”

Tools:
- Table saw
- Jigsaw
- Cutting guide
- Drill
- Hammer
- Nail set
- Tape measure
- Speed square
- Wood rasp(s)
- Sandpaper/sander
- Caulk gun
- Clamps
Materials:
- 2 sheets of 4-by-8-foot-by-¾-inch
AC or MDO plywood
- 1½-inch finishing nails
- 1-inch to 1⅛-inch brads (or
pneumatic brad setter)
- 1 or 2 tubes of construction
adhesive
- Wood filler
- Enamel paint or varnish
Cutting Out The Parts
Step 1. First, view the drawings and photos to get an
overview of the process and the outcome. Set the table-saw rip fence to 16
inches and cut five 16-by-48-inch pieces from one sheet of ¾-inch plywood.
These are the supports/dividers. If you’re not using a table saw, use a cutting guide
to keep your saw aligned—the back edge of one support/divider may be the visible
edge of the next one. Cut the remaining ~15⅜-by-48-inch leftover length to 32 inches
and set this blank aside for action in Step 4. (Note: “~” is used to indicate
“approximately.”)
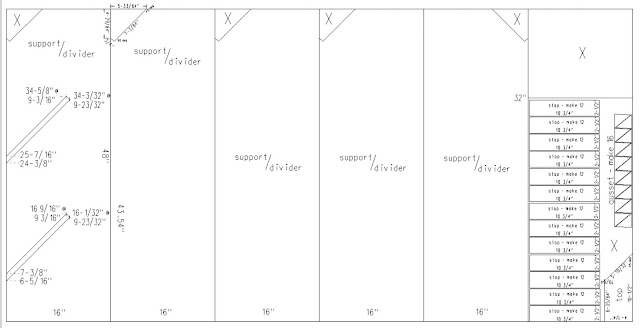

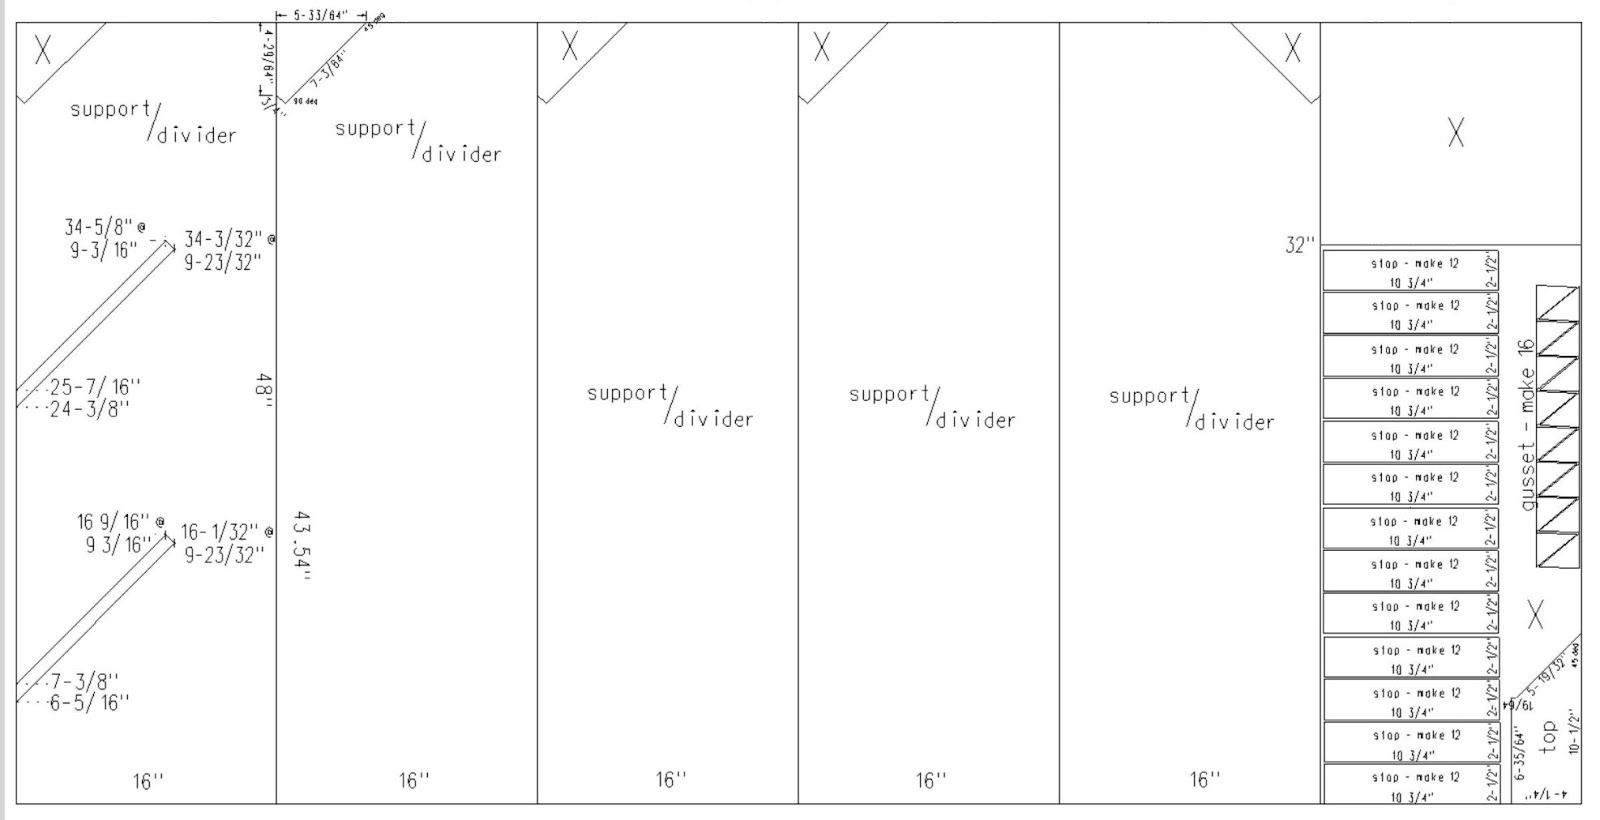

Step 2. On the five supports/dividers created in Step 1, identify which
corner you’d like to remove, lay out the cut lines as shown below and cut out the
scrap piece “X” with a jigsaw. When using “one-side-good” plywood, at least one
of the supports/dividers will have its clipped corner in a different position
on the piece to keep the good side out on the side of the completed rack. Place
these in a “pending” stack. All will have a support top attached in Step 9.


Step 3. Move on to the second sheet of plywood. Lay out a line and carefully cross-cut the
sheet, creating a 48-by-46¾-inch blank. Set the rip fence on the table saw to
rip three 13⅜-by-46¾-inch pail platforms from this blank. Before cutting the
third or top pail platform, change the blade angle to 45 degrees. If using AC plywood,
cut this piece so the good side is 13⅜ inches wide and the underside is 12⅝ inches
wide. You may have to adjust the fence accordingly. Place these three parts in
the pending stack.
Restore the blade to 90 degrees, set the fence to a smidge under 6 and 9/16 inches and rip the bin top from the leftover of the 46¾-inch blank. Start a “done” stack with it.
Restore the blade to 90 degrees, set the fence to a smidge under 6 and 9/16 inches and rip the bin top from the leftover of the 46¾-inch blank. Start a “done” stack with it.
Step 4. The remaining 49-inch half of this second plywood
sheet is nearly square, so watch the panel orientation. Set the rip fence to 8
inches on the table saw and crosscut an 8-by-48-inch piece for the lower bin
skirt. Move the fence to 2½ inches and crosscut a 2½-by-48-inch piece for the
mid-bin band. Trim both pieces to 46¾ inches in length and park these in the
done pile.
Set the fence to 10¾ inches and rip four 10¾-by-~38½-inch blanks from what’s left of the second plywood sheet. Save the ~5-inch-wide piece remaining to make support tops in Step 5.
These 10¾-by-38½-inch blanks will become the bin bottoms. Leaving the fence set at 10¾ inches, run each of the four blanks through the saw once, yielding four 10¾-inch square parts for the done stack. These are the lowest bin bottoms in the project and are called “bin Ladens” to differentiate them from the larger bin bottoms to be made next.
While the fence is set for 10¾ inches, find the 32-inch blank created in Step 1 and run it through the table saw lengthwise, creating a 10¾-by-32-inch blank and a remainder blank. Set both in the pending stack. The 10¾-inch piece becomes a pail stop in Step 8; the remainder becomes both a support top in Step 5 and a stop gusset in Step 8.
Change the fence to 12⅞ inches and pass each of the four now ~28-inch blanks through twice, yielding eight 10¾-by-12⅞-inch bin bottoms for the done pile. Place the scrap 10¾-inch parts remaining in the pending pile. They will become feet/gussets for the bin Ladens.
Step 5. Set the fence to rip the ~5-inch piece leftover in Step 4 to 4¼
inches. Lay out four support tops per the dimensions shown below. Take the
remainder blank also created in Step 4 from the pending pile and rip it 4¼-inches
wide for 11 inches. Cut this piece from the remainder blank and lay out a fifth
support top on this piece. If using AC plywood, make this one as a mirror image
so that the good side will be out. Cut out these five pieces and put them in
the pending stack, along with the leftover remainder blank.


Step 6. Lay out the two pail platform slots on the supports/dividers as shown below, measuring from the bottom and/or front edges. The points as specified will result in 13-inch, 45-degree-angled slots viewed from the base. Carefully cut out the slots. Use a piece of scrap from sheet 2 as a test fit in the slots and use a wood rasp to clean up any tight spots you encounter.

Step 7. Pick the pail platforms from the pending pile. Note that there are two kinds: The top pail platform has a 45-degree edge, and only the middle and lower pail platforms will get five ⅜-by-¾-inch locking slots cut from them.
Lay out the pail cutouts on all three pail platforms per the dimensions shown below. You can create a cardboard template for this purpose. The dimensions shown, including the radiused corners, will allow bulging pails to pass. The pail cutouts are 1⅜ inches from the beveled edge in the top pail platform.

On the middle and lower platforms, lay out the five locking slots as shown. When complete, drill a hole to pass your jigsaw blade in each of the 12 pail cutouts near the cut line. Use the jigsaw to complete each piece, removing only pail cutouts from the top pail platform and both pail cutouts and locking slots from the middle and lower pail platforms. Place these in the done pile.
Step 8. Take the 10¾-by-32-inch
blank created in Step 4 from the pending stack. Set the rip fence to 2½ inches
and rip twelve pail stops for the done stack.

Find the remainder blank from Step 4. Lay out 16 stop gussets per the dimensions shown below and cut them out. Find the scrap 10¾-inch bits from Step 4 and convert them into feet as shown below. The 2-inch dimension is not critical; the feet may be taller or shorter than 2 inches without affecting function. Additional feet—you’ll need a minimum of five—may be obtained from the remainder of Sheet 1 or from pail cutouts. Place all completed parts in the done pile.


Find the remainder blank from Step 4. Lay out 16 stop gussets per the dimensions shown below and cut them out. Find the scrap 10¾-inch bits from Step 4 and convert them into feet as shown below. The 2-inch dimension is not critical; the feet may be taller or shorter than 2 inches without affecting function. Additional feet—you’ll need a minimum of five—may be obtained from the remainder of Sheet 1 or from pail cutouts. Place all completed parts in the done pile.

Assembling The Rack
Step 9. There are a few ways to attach the support tops
to the supports/dividers. If you have a biscuit joiner, great! I chose to use
some ½-inch plywood bits from my scrap box for gussets (anywhere from 4-by-10-inch
to 6-by-7-inch pieces will do). Be sure that your gussets will not protrude
beyond the edges of the parts you’re joining.
Once you’ve obtained your five gussets, verify that you have your right side/left side part pairs marked good-side-out so they don’t get misassembled. Place the support/divider panel flat on your work surface with the good side down. Align a support top, also facing good side down, along the 10½-inch dimension and, using a straightedge, verify that the 45-degree edges are aligned as well. If acceptable, separately start a few brads in the gusset material. Apply construction adhesive to the 10½-inch side of the support top and join them. Make sure that the 45-degree edges are aligned. Apply adhesive to the gusset and drive the brads home. Clean up any squeeze-out on the good side. Be certain that the parts remain flat and set them aside to cure. Repeat for all five pairs of parts and cap the adhesive. Verify that your right-side-out/left-side-out assemblies have their good sides showing.
Once you’ve obtained your five gussets, verify that you have your right side/left side part pairs marked good-side-out so they don’t get misassembled. Place the support/divider panel flat on your work surface with the good side down. Align a support top, also facing good side down, along the 10½-inch dimension and, using a straightedge, verify that the 45-degree edges are aligned as well. If acceptable, separately start a few brads in the gusset material. Apply construction adhesive to the 10½-inch side of the support top and join them. Make sure that the 45-degree edges are aligned. Apply adhesive to the gusset and drive the brads home. Clean up any squeeze-out on the good side. Be certain that the parts remain flat and set them aside to cure. Repeat for all five pairs of parts and cap the adhesive. Verify that your right-side-out/left-side-out assemblies have their good sides showing.
Step 10. Once the supports/dividers have cured, dry-fit
the pail platforms into the supports/dividers. Place an “inside” support/divider
on edge on a large surface with the 45-degree slot facing up. (Clamping it to
the table saw fence works OK here.) Install the middle pail platform into the
proper slot at the correct position—the ⅜-by-¾-inch locking slots on the pail
platform go first, or “up” the slot. Unclamp and remove the fence, then add the
other supports/dividers in their correct locations, with the right and left
outside supports having their good sides out.
Install the lower pail platform in the lower slots. Be sure that all platform locking slots fully engage the plywood at the end of the 13-inch support slot. The bottom edge of the pail platforms should be flush with the support at the top of its slot: at the 7⅜-inch and 25-and-7/16-inch points shown below. For now, it’s OK if the platform rests below flush on a support or two—you’ll fill the gap with glue. But you must correct any support or platform slot where the platform protrudes beyond the front edge of the support. Note any tight fits to touch up with a file or sandpaper. Check squareness by measuring across the diagonals corner to corner and comparing both legs of the X—you should be within 1/16 inch to ⅛ inch of the other’s measurement if the frame is square.

Install the lower pail platform in the lower slots. Be sure that all platform locking slots fully engage the plywood at the end of the 13-inch support slot. The bottom edge of the pail platforms should be flush with the support at the top of its slot: at the 7⅜-inch and 25-and-7/16-inch points shown below. For now, it’s OK if the platform rests below flush on a support or two—you’ll fill the gap with glue. But you must correct any support or platform slot where the platform protrudes beyond the front edge of the support. Note any tight fits to touch up with a file or sandpaper. Check squareness by measuring across the diagonals corner to corner and comparing both legs of the X—you should be within 1/16 inch to ⅛ inch of the other’s measurement if the frame is square.

Step 11. While the rack is in the dry-fit stage, make pencil lines on the pail platforms so that when they’re removed, you know where to put the adhesive. Remove the middle pail platform, apply adhesive to both sides of the pail platform and the five locking slots and restore it into the rack. Verify that the platform is flush with the front of the support as it was before. Hammer in a 1½-inch finishing nail through the edge of the support/divider just above the “flush point” through the pail platform and into the other side of the slot to hold the panel in place. Check squareness periodically. Temporarily tuck in a bin bottom or two to maintain alignment. Repeat with the lower platform.
Glue squeeze-out is expected. Add more if necessary. Run your finger along the joint to distribute the squeeze-out into a fillet (“fill-it”) spanning both sides to create a strong join between the parts. Use a popsicle stick, finger cot or a nitrile glove if you wish—some adhesives will stick aggressively to you. Most construction adhesives don’t sand well, so tool the glue when you can.
Check squareness, then install the top pail platform. Apply adhesive to the slope edges of five support/support-top combinations. Lay in the platform with the square end down and good side up. Secure with finishing nails into each support/divider. Control squeeze-out as above, then allow the rack to cure.
Pin the image below to save this information for later.

Step 12. Stand the rack upright on a workbench. Place a
pail in one of the two middle-tier center holes with the pail rim flat on the
pail platform. Fit a bin bottom (10¾-by-12⅞-inch) in the pail hole. Align the
bin bottom with the pail. You should find that with the pail removed, the bin
bottom is flush with the pail cutout, and the other end of the bin bottom is
resting on the lower pail platform. Mark for gluing the underside of the middle
pail platform, the sides of the two supports/dividers and the top edge of the
lower pail platform.
Apply adhesive. Pass a 14-inch-capacity clamp through the pail hole and insert the bin bottom. Adjust the bin bottom to be flush with the pail hole and secure the clamp. View the back of the rack. Hammer in five 1½-inch finishing nails through the bin bottom into the lower pail platform. Turn the rack around to the front, verify flush and drive five finishing nails through the middle pail platform into the bin bottom. Control squeeze-out. Repeat for this middle tier, then proceed to the upper tier, until all eight bin bottoms have been installed.
Lay the rack on one side and, using a pail as above, test-fit a bin Laden in the lower tier. You should find that the bin Laden protrudes from the base by ¼ inch to ⅜ inch or so. Mark the edge of the bin Laden where it crosses beyond the support/divider and use the table saw to remove the excess. A 45-degree blade angle is OK here (sticklers can try to set 43⅓ degrees) to trim the part. After trimming, restore the part into a center hole with the pail and mark glue lines on the side walls. Apply adhesive, verify the bin Laden is flush with the pail hole, clamp and drive finishing nails through the sidewalls into it. Next, drive nails through the lower pail platform into the bin Laden. Control squeeze-out. Trim and install the remaining bin Ladens.
Step 13. With the bin bottoms installed, place a pail in
one of the holes and use spring clamps to hold the pail rim in place. Locate a
pail stop created in Step 8 against the pail’s bottom. Clamp the pail stop in
place and remove the pail. Mark glue lines on the bin bottom and the sidewalls,
then hold gussets to both sides and mark glue lines for the gussets. Remove
gussets and the pail stop. Drill five 1/16-inch pilot holes for the finishing
nails between the marked glue lines on the bin bottom. Apply adhesive to the
sidewalls and the bin bottom, clamp in a pail stop and nail through the bin
bottom into the stop. Follow up promptly with glued gussets, clamp and nail. If
you don’t have a clamp with enough reach, drill the stop diagonally and toenail
the stop into the sidewalls. Control squeeze-out. Repeat for all pail locations
in the middle and upper tiers.
Follow the same procedure for the lower tier, substituting the feet for the gussets above. It’s OK if the feet protrude beyond the back edge of the rack; it’s not OK if the feet extend beyond the bottom edge. You can use as few as five or as many as eight depending on how you nailed in the pail stops and the anticipated loading of the completed rack.
Follow the same procedure for the lower tier, substituting the feet for the gussets above. It’s OK if the feet protrude beyond the back edge of the rack; it’s not OK if the feet extend beyond the bottom edge. You can use as few as five or as many as eight depending on how you nailed in the pail stops and the anticipated loading of the completed rack.
Step 14. Lay the rack on its back on the workbench. Dry-fit
the lower bin skirt; it should be flush with the bottom edge all along the
line. There will be small openings where the skirt (and band) covers the pail
platform slots. You can either ignore these or fill them with cuts from one of
the scraps produced in Step 3. Mark them, apply adhesive and nail them in
place.
Center the mid-bin band over the middle pail platform slot. Verify that the band is parallel with the floor/bottom edge. Again, mark them, apply adhesive and nail them in place.
Set the rack assembly on the floor carefully as it’s getting heavy. Dry-fit the bin top, mark glue lines, apply adhesive and nail them in place. Remove any visible squeeze-out between the bin top and the upper pail platform; fillet all hidden squeeze-out.
Step 15. Allow the adhesive to cure. Use a nail set to
drive all visible finishing nails below the surface. Use wood filler to patch
holes in the skin (including from finishing nails) and voids in plywood edges. Sand
all surfaces; round over all edges you could come in contact with. Remove
sanding dust and paint with a hard enamel or varnish capable of taking some
wear and abuse. Allow the unit to dry thoroughly before use.
Congratulations! You now have a useful addition to your homestead. One thing is certain: Once you build one, you quickly find you could use another one!
Congratulations! You now have a useful addition to your homestead. One thing is certain: Once you build one, you quickly find you could use another one!

I love this idea! It could be used for any kind of storage! I'd love to see a video as I'm more of a visual learner. Great Idea! I've been trying to figure out a better way to organize all those free litter buckets I've received from Freecycle, Craigslist, Facebook Marketplace, and the local Humane Society and Vet Offices!
ReplyDelete